
 Setting up a VPN on Windows 10: A Quick Step-By-Step Guide
Do you need to connect to a VPN via your Windows computer? Sometimes you don’t have VPN software to help you out and you have to set it up yourself instead. Fortunately, this is quite easy to do. Simply follow these steps:
1. Make sure you have the right login details for your VPN-account. If you’re still looking for a VPN provider, you might want to try out CyberGhost:
2. Click the Windows logo and go to “Settings.” Choose “Network & Internet” and click “VPN.”
3. Add the VPN connection by clicking “Add a VPN connection.” Enter the correct login information and click “Save.”
4. Select the connection within the VPN Settings screen and connect.
If you run into problems while trying to set up your VPN, or you simply want more information, you can read our full article below.

There are several ways to set up a VPN on your Windows 10 computer. In this article, we’ll discuss how to set up a VPN through your Windows settings. This is useful if you want to use the VPN network provided by your employer or connect to a remote network, for example.
 Many VPN service providers provide special software that allows you to easily and quickly connect to one of their many VPN servers. However, some VPNs, including many corporate networks, don’t come with their own software. Fortunately, Windows has a feature that allows you to set up a VPN manually.
In this step-by-step guide, we’ll explain how you can set up a VPN connection in Windows 10. Do you have a VPN service that offers its own software, such as NordVPN or CyberGhost? Scroll down for a quick guide explaining how to set up your VPN with this software.
Step 1: Get the Right Login Details
To set up a VPN connection with Windows 10, you need the right login details. Otherwise, you won’t be able to access the VPN server. If your VPN connection is arranged through your work, you’ll need to ask your boss for the correct login information.
Do you work with a VPN for private use? Then you created these details yourself when setting up your account. With this information, often consisting of a username and password and possibly a specific server address to connect to, you can follow the three steps below to connect to the VPN.
If you don’t have a VPN account and sign-in info yet and are looking for a good VPN app to protect your internet connection, you could always try CyberGhost. This provider is very cheap, but still of great quality. Moreover, they have a 45-day money-back guarantee, allowing you to try out the service first.
- Very user-friendly
- High quality for a low price
- Torrents and Netflix possible
Step 2: Open VPN Settings in Windows

Do you want to install a VPN on Windows 10? First of all, you need to make sure you’re using a Windows account with administrator rights. Usually, the owner of the computer has these rights. He or she can also distribute them to others. If you only have one user account on the device you’re working with, you’ll automatically have these rights.
Go to the start menu (by clicking the Windows logo in the bottom left corner of your screen) and click Settings. This button often looks like a small cogwheel. Once the “Settings” screen opens, click Network and Internet from the menu. Then choose VPN from the list on the left side of the screen.
The image on the right of this text shows what this looks like. You’ve now found the VPN settings screen on Windows and are ready to add a VPN connection to your operating system.
Step 3: Adding a VPN Connection
It’s time to add a VPN connection. First, click on the button at the top that says Add a VPN connection.

A blue screen will appear. Here you can enter the details of your VPN provider. In some countries, you can choose a VPN provider from a number of standard providers, but this step-by-step guide focuses only on the Windows (built-in) option.
Give the VPN connection a recognizable name under Connection name. You could, for example, opt for “VPN connection work” if you only need it for work-related activities.
 Under Server name or address, enter the IP address or server URL of the VPN server. This information is provided by the provider of the connection, e.g. your boss.
Under VPN type, choose the VPN protocol you wish to use. In most cases, you’ll be able to select the Automatic option from the drop-down menu. For more information about VPN protocols, please read our article on this topic.
Under Type of sign-in info you can specify the way you wish to log in. In most cases, this involves using a user name and password. Alternatives include logging in with a smartcard or certificate.
Under User name and Password, fill in the necessary login details.
Note: it is safest not to make the computer remember your sign-in info if you’re using a public computer. Only choose to save the data if your computer can’t be used by strangers and is well protected!
Once you’ve finished entering all the necessary data, click Save.
Step 4: Connecting to the VPN Server
Using the VPN menu in Settings (as described in step 1) you can now select the added VPN connection from the list shown and connect to that VPN server. Now you are securely connected and can access the internet safely and privately.
Advanced Settings
After adding a VPN connection, you’ll have extra options besides switching your VPN off and on. You could, for example, set up a proxy server. To do this, go to the advanced menu. This can be done by following step 2 again, clicking the VPN connection you wish to change and choosing Advanced options.
Only change these settings if you’re absolutely sure of what you are doing. Windows and your VPN provider are already working together to provide you with a secure connection. So, you don’t have to change any advanced settings in order to be protected online, especially as a beginner.

To access the VPN section in your settings quickly and easily, you can follow the instructions laid out in step 2, but you can also click Notifications (the information balloon) in the bottom right corner of the taskbar. The screenshot above shows what that screen looks like. Click VPN and you’ll be taken directly to the VPN Settings screen.
VPN Software on Windows 10
Using your VPN via your settings in Windows 10 can be very useful. After all, Windows automatically connects you to the VPN server, so you won’t have to manually turn the VPN on every time. Moreover, it gives you the opportunity to connect to a private network remotely and securely. Think, for example, of people working from home using a VPN server to give them access to all documents and other files within the company network.
However, it isn’t always convenient to link your VPN to your operating system. If you use a paid VPN provider such as NordVPN or Private Internet Access, we recommend you use the included software. These programs often support additional VPN protocols, use their own DNS servers to prevent DNS leaks, and have a kill switch that automatically intervenes if your VPN connection drops. In other words, you’ll be more secure if you use the VPN software instead of logging into your VPN server through Windows.
Setting up a VPN on Windows with VPN software: a step-by-step guide
Installing a VPN on Windows 10 using official VPN software is very easy and goes as follows:
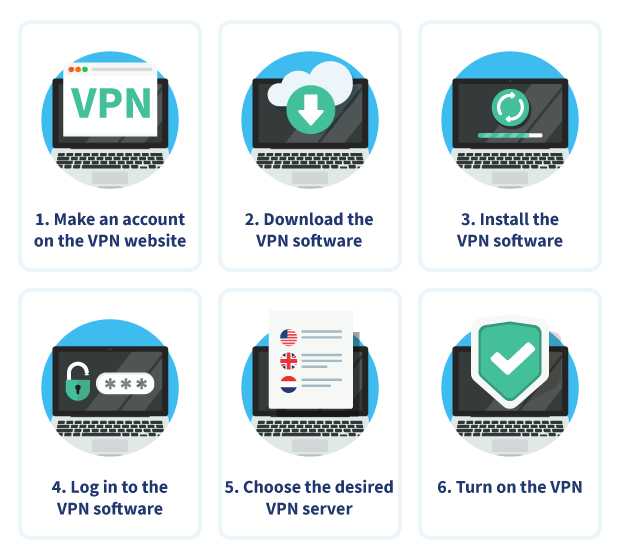
- Create an account on the VPN website. Go to the official website of the desired VPN provider (e.g. CyberGhost’s website) and choose the subscription you want. Go through the steps to purchase a subscription and create an account.
- Download the VPN software from the official website. Often, your provider will send you through to the download right after you’ve taken out your subscription.
- Install the VPN software. Once the installation file has been downloaded, you can click it and follow the steps to install the VPN software on your computer.
- Log in to the software with your account. This is often a matter of filling in the username and password combination you created in step 1. Be sure to use a password manager to create a strong and secure password.
- Choose the desired VPN server (optional). Depending on what you wish to do online, you can choose a suitable server location. You could, for example, choose an American server to watch the American version of Netflix or unblock Skype, Facebook, or any other services that might be censured in your country. If you don’t have a specific goal in mind other than to go online safely, you can simply choose the server closest to you.
- Turn on the VPN. Most VPN programs have a large power button that will turn on the VPN with just one click. In fact, if you skip step 5, the software will likely automatically select the nearest or fastest server for you.
Why Use a VPN on Windows 10?
There are many reasons for people to use a VPN. These are the most common ones:
- Data encryption for extra protection against hackers and cybercriminals (as well as other eavesdroppers, such as governments and businesses);
- Secure use of public networks;
- Access to services that can only be used within a company or institution’s network;
- Hiding your real location and IP address;
- Anonymously downloading torrents;
- Bypassing regional blockades of, for example, certain film services (Netflix) or social media networks;
- Bypassing censorship in a country;
- Increasing the speed of a connection to another server.
Setting up a VPN on your Windows 10 computer is always a good idea. You probably use your device for many of your daily Internet activities. With a VPN, you’ll be protected during all these activities while also increasing your online privacy and freedom.
If you don’t already have a VPN and would like to use one to secure your private network, you have several options. You might want a private VPN provider. If you have no idea where to start, take a look at our top 5 best VPN providers. This list might help when you’re trying to make your choice.
Do you have a question about setting up a VPN on your Windows system? Click on your question below and you’ll automatically get to see the answer. Still running into a problem? Don’t hesitate and leave a comment under this article. We’ll happily help you out.
There are two ways to set up a VPN on your Windows computer. First, with VPNs such as ExpressVPN and Surfshark you can install the included software. Then you simply press a button and the VPN connection is set up. If you don’t have any software, you can do this yourself in Windows. Go to the “VPN” section of your settings and manually add a VPN connection.
Using a VPN comes with many advantages. It protects your internet connection, can give you access to specific networks, such as your job’s network when you work from home, and protects your privacy. It also increases your internet freedom. With a VPN you can go online more securely without too much effort.
If you want to use a private VPN to secure your internet connection, you have many options. Thankfully, there are many good VPN providers that will protect your connection and increase your online freedom. We made a list of the five best VPN providers available today, all of which will work perfectly on your Windows computer.
-

-

-

 https://vpnoverview.com/vpn-setup/install-vpn-windows/